Monday, September 26, 2011

Make it Yourself Monday: Eco-Friendly Liquid Hand Soap

For a long, long time, I bought hand soap on an almost weekly basis, usually either a store brand (if I was feeling cheap), or a more expensive brand from a specialty store.  
Then I started reading the ingredients. The soaps my family and I had been using contained multiple unpronounceable ingredients. For example, virtually all conventional hand soaps (and most other conventional body cleansers) contain Sodium Lauryl Sulfate, a known neurotoxin (For more information, visit the Environmental Working Group’s Skin Deep website).
Like many changes in our household, the decision to use a more natural hand soap was born out of concern for toxic ingredients, but also out of the need to find a less expensive alternative. 
Instead of costly and chemical-laden traditional hand soap, I use a combination of Dr. Bronner’s Liquid Castile Soap and plain water.  
All you need to make your own liquid handsoap is a reusable foaming pump like this one from Amazon, and a bottle of Dr. Bronner’s -- any type.

Fill up the foaming pump bottle nearly full with plain tap water. Add 1 tbsp of Dr. Bronner’s liquid castile soap. That’s it! 
Since there is only .5 oz in each tablespoon, and Dr. Bronner’s is $.40/oz at Amazon right now, you are only paying $.40 for each bottle of hand soap you make.  Considering an average store-bought dispenser of hand soap costs between $2 and $6, that is quite a savings, especially if your family is like mine and does a LOT of hand washing.
I’ll be honest -- there are plenty of other recipes floating around cyberspace for making your own liquid hand soap. I like my Dr. Bronner’s mixture because I think it’s the easiest. When I run out, all I have to do is fill up the container with water, add a tbsp of soap, and screw the top back on.  I can’t see myself making anything that involves boiling soap scrapings. I never thought I would talk on the internet about Mama Cloth either, though, so never say never!

Labels:

Tuesday, September 20, 2011

Make It Yourself Monday, Errr- Tuesday: Easy Peasy Peach Tart

As you can see I'm about 24 hours too late for my Make it Yourself Monday recipe feature. The beginning of the school year and all its related tasks and business are really catching up to me! Anyway, I was inspired to make this Peach Tart by one of my friends, who was inspired by Real Simple.  In its Real Simple incarnation, this recipe is for a 3-Ingredient Nectarine Galette, and was featured on the cover of the July 2011 issue. My friend recreated the recipe perfectly and deliciously for a recent playdate.


Of course, I couldn't just keep it a 3-ingredient recipe; I had to tinker a bit with it.  I  decided to use fresh, locally grown peaches, and add some seasonings. One thing I didn't change: the store-bought crust.  I actually attempted this peach tart last week using a homemade crust -- but, for some unknown reason, I didn't use my great-grandma's tried and true pie crust recipe. The tart turned out to be a crumbly mess.  I had to keep adding flour because the dough kept sticking to my wooden rolling pin, but the more flour I added, the crumblier it became. It was a disaster.  Don't get me wrong -- I still baked it, ate it, and picked the crunchy crumbs off the bottom of the pan with my fork.  It tasted great, but it certainly wasn't pretty.


Because I was expecting company for dinner last night, I really didn't want to take a chance, so I purchased Wegmans' pre-made refrigerated crust for my second attempt.  Result: it worked beautifully, tasted like gooey, sweet, late summer amazingness, and was completely demolished in one sitting. :)


Easy-Peasy Peach Tart


For the filling:
3 large or 4 small fresh peaches, peeled and sliced
1 tbsp water
1 tbsp sugar
1 tsp corn starch
1/4 tsp nutmeg
pinch cloves


For the crust:
1 store-bought refrigerated pie crust
1 tbsp egg white (I just put the remainder of the egg in a container in the fridge and scramble it up later)
1/2 tbsp sugar


1. Unroll the dough and press gently into a tart pan or a small pie pan. There will be extra hanging off the sides; that is what you want.
2. In a small pan, combine the peaches, water, sugar, and corn starch. Simmer on medium low for 10 minutes. Add nutmeg and cloves and simmer an additional 5 minutes.
3. Take the peach mixture off the heat and pour it carefully into your dough.  Gently fold over the extra dough, so it looks like this:
4. Brush the exposed dough with the egg wash and sprinkle with sugar. 
5. Bake at 350 for 40 minutes, checking halfway through, until crust is brown and filling is bubbly. 
5. Cool slightly and enjoy. This would be amazing accompanied by fresh organic vanilla bean ice cream.

Labels: ,

Monday, September 12, 2011

Make it Yourself Monday: Homemade Applesauce

I’ll be the first to admit that making your own applesauce is not the least bit difficult.  Filling my freezer with jars and jars of homemade applesauce is one of my favorite fall activities. And the best part is how it makes the house smell. One whiff of that cinnamon-y apple goodness, and you know it’s fall. 
The early crop of Burgundy apples I used for this batch of applesauce literally just appeared at my door. Well, to be accurate, they were delivered by my brother from my parents’ house.  My mother’s friend has an apple orchard and was practically giving apples away.  I got an entire bushel for only $5!! That is less than the price of 2 jars of Santa Cruz Organic Applesauce at Wegmans. 
These apples were a little time-sensitive, since they had been at my mom’s house for a few days before I got them and it was swelteringly hot out, so I had to make the applesauce right away. 
There are as many applesauce making methods as there are varieties of apples, but what follows is the method that works the best for me.  Keep in mind that this is my bulk recipe, but it’s pretty foolproof to adjust to whatever quantity of apples you have on hand. 
Homemade Applesauce
Step One: Wash your apples. I just fill the sink with cold water and agitate them gently for a few minutes.

Step Two: Cut the apples into quarters. I don’t peel, de-stem, or de-anything to my apples. I generally use organic apples, so I worry less about the pesticide residue. If I know I’m using conventional apples that have been sprayed, I will use my apple peeler to peel them first.

Step Three: Fill a stock pot no more than 2/3 full of apples. Fill halfway with water, but don’t cover the apples with the water. Some people will disagree with me here, but I really prefer a thick applesauce to a watery one.


Step Four: Simmer on Medium Heat uncovered for about 20-30 minutes. Keep an eye on the apples and stir a few times. You’ll know the apples are done when the skins are falling off and they are fairly mushy. They don’t have to be sauce consistency yet, though.
Step Five: Here’s where the magic happens. Break out the Foley Food Mill, pour in apples, and grind away. All the savory apple yumminess will be strained through, while all the solid seeds and peels will be left in the food mill. Oh, you’re going to need a big bowl to mill the sauce into. I’ve used the Tupperware bowl pictured forever.

Step Six: Add sugar and cinnamon. For the quantity of apples used here (one bushel), I used a cup of sugar and 3 tbsp cinnamon. You could also add some nutmeg or ginger for a more savory bite. I tend to keep mine kind of bland because I also use the applesauce as an oil substitute in my baking, and I can always add more spices into individual servings. 
Step Seven: Let cool in the large bowl for a few hours, then carefully ladle into mason jars.  When the applesauce is completely cool, screw on the tops and freeze!  Applesauce will stay good in deep freeze for up to a year.
There are so many uses for homemade applesauce: it’s an easy snack for kids, a good add-in to waffles, a substitute for oil in baking recipes, swirled into oatmeal, or made into a glaze for pork dishes.  It’s easy to make, delicious, healthy, and inexpensive. What could be better?

This recipe is part of Live Renewed's Your Green Resource Link-Up!

Labels: ,

Monday, August 15, 2011

Make it Yourself Monday: Homestyle Italian Meatballs

I know everyone has their own favorite meatball recipe, but this one is close to my heart. I have great memories of Sunday nights at my grandmother's house, eating these meatballs in long-simmered marinara sauce.  You may thing you've had delicious meatballs before, but if you haven't had my grandmother's recipe, you need to fry some up for yourself. 


Yes, I said fry. You can bake them for a more healthful preparation, but they won't be just like grandmas.  At the risk of sounding like Paula Deen, some things -- potatoes, bacon, oreos -- just cry out to be fried. Hey, at least this recipe uses heart-healthy olive oil!


Grandma's Sunday Meatballs


1 lb ground beef
3 slices day-old Italian bread, crumbled into coarse crumbs
3 eggs
3 cloves garlic, finely chopped
1 tsp dried parsley
1/2 tsp dried basil
1 tbsp good quality grated parmesan or pecorino cheese
1/2- 3/4 tsp salt
3/4 tsp pepper
olive oil


  • Whisk together the eggs and bread crumbs in a medium bowl. Add the garlic, parsley, basil, cheese, salt, and pepper to the egg mixture.  Mix until thoroughly combined
  • Add the egg mixture to the ground beef in a large bowl. Combine all ingredients manually -- that's right -- you have to get your hands dirty!
  • Form the mixture into balls, roll them in a light coating of olive oil, and pan-fry.
  • Place them on a paper towel on a plate
  • Serve with red sauce and pasta
Note: these can easily be frozen if you have the fortitude not to eat them all in one sitting.
I still have some in my freezer from my Once a Month Slow Cooker Freezer Cooking from the Stockpile extravaganza.  


Labels: ,

Monday, August 8, 2011

Make it Yourself Monday: Iced Frappuccino

While I'm not a huge coffee drinker, I LOVE Starbucks Iced Frappuccinos. It's more like a dessert in a cup.
What I don't love? How friggin' expensive they are!  The smallest size (which, of course, is called "Tall") costs between $3.50 and $4.00, depending on your location.  And a "venti" -- that's large to us regular folks -- costs upwards of $5! I can feed my whole family dinner for that amount!


But they're still delicious, so I did a little research to see how I could replicate this drink at home. Here's what I came up with.


Homemade Iced Frappuccino
(adapted from Scott D Irwin's Blog)
1 cup strong dark brewed coffee (I like Green Mountain Dark Magic for the Keurig)
3/4 cup whole milk (you can easily use a non-dairy milk as well)
4 tbsp. granulated sugar
2 cups ice
1 tsp pectin


For the topping:
Heavy whipping Cream (or canned, but it's not very eco-friendly!)
Chocolate Syrup (Plain ol' squeeze-bottle Hershey's works great)


1. Mix the first 5 ingredients in the heaviest-duty blender you have. You want the consistency as smooth as possible. I used my Cuisinart and it worked great.
2. Pour ingredients into a large glass, leaving 1/2" at the top.
3. Whip up the whipping cream with a hand mixer.
4. Swirl whipped cream and chocolate syrup onto your drink!


This whole recipe can be made for about $1, and is equivalent to a Venti Starbucks drink -- saving you about 80%! And you never have to leave your house!


A note on the pectin: I didn't use it when I made my drink at home because I'm just coming off a jam-making bender and didn't have any in the house. The frappuccino tasted fine without it, but adding it will give you that thick, smooth mouthfeel that will convince you it's more like the store-bought version. 

Labels: ,

Monday, August 1, 2011

Make it Yourself Monday: Garlic Herb Butter

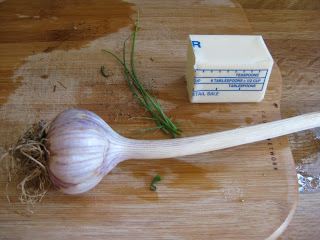
I'm running a little late for my Make it Yourself Monday post.  We had a family reunion in the Adirondacks this weekend and I was doing the whole shopping/laundry thing today.  But it's still Monday for a few more hours!  Today for dinner I had some amazing fresh green beans from the CSA that I wanted to use. I sauteed them in the most amazing homemade garlic herb butter, and they were near perfection.


Wegmans sells Garlic "Finishing Butter" for $2.49 for 3.5 oz.  After buying it a few times -- it really is pretty yummy -- it dawned on me that it's not that hard to combine butter, garlic, and some herbs.


Garlic Herb Butter
3 tbsp salted butter 
2 fresh garlic cloves
a handful of fresh herbs (I used chives from my garden)


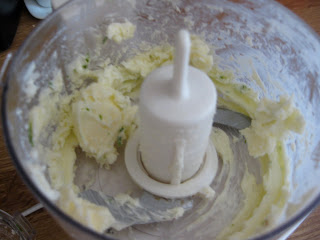
Combine all ingredients in a food processor and voila! Beautiful, flavorful butter to complement any fresh vegetable.  


Labels:

Monday, July 25, 2011

Make It Yourself Monday: Herbed Vinegar and Oil

Can you think of anything better for a light summer dinner than a crisp salad of freshly picked greens?  Not much comes close, especially if you dress your salad with a wonderful homemade herbed vinegar and herbed oil.  Pure summer perfection.  
I had the opportunity this weekend to spend a morning making delicious herbed oil and vinegars with a friend.  I loved this project because it’s so little work for such an amazing taste pay-off! You can use whatever herbs you have around because there’s really no way you can mess this up.  

Step One: Choose and Harvest your Herbs. Almost anything goes. Use whatever fresh herbs you have available, and feel free to mix and match. Because of the bounty of my dear friend’s herb garden, I used cuttings of tarragon, oregano, thyme, rosemary, dill, and lemon balm.

Step Two: Assemble your tools: You'll need various glass jars, a small funnel, and a rolling pin.

Step Three: Gently heat your vinegar or oil. It should be hot, even steaming, but definitely not boiling. You don’t want to cook the herbs.  I microwaved 8-12 oz of oil or vinegar in a glass measuring cup for about a minute, maybe two for the vinegar.

Step Four: Place herbs between two towels. Lightly roll over it several times with a rolling pin.  This releases the natural oils and fragrances of the herbs.

Step Five:  Add the herbs to your jar. Beautiful, decorative glass jars or even old wine bottles are wonderful for this. Try to make sure your herbs are cut side towards the bottom of the jar, so as many oils as possible infuse your liquid.

Step Six: Pour the oil or vinegar over your herbs, and seal shut. That’s all there is to it!

Yummy Combinations:
  • Dill and Lemon Balm in vinegar for a zesty cucumber salad
  • Oregano and Thyme in for an AMAZING dipping oil for crusty Italian bread
  • Rosemary, Crushed Peppercorn, and Lemon Balm for a basting oil (like Wegmans’) or  to drizzle over grilled veggies

Tips:
  • Any mild-tasting oil works for this project. Safflower or sunflower are best, but a mild olive oil will work as well.
  • For vinegar, I used apple cider, but plain white vinegar works well too.
  • Vinegars can be shelf-stored indefinitely in an air-tight container.  If it’s been a while, just give the herbs inside a glance and make sure they are still somewhat recognizable.
  • Oils are much more “touchy.”  Only make as much herbed oil as you will use within 3 months. 


Labels: ,

Monday, July 18, 2011

Make it Yourself Monday: Hoisin Sauce

Last week I was looking for a recipe to use some ground beef and sliced cabbage, and came up with this Mu Shu beef.  It called for hoisin sauce, which I don’t happen to have on hand.  I was determined to make the recipe, so I found a homemade version on Food.com, which I  adapted using ingredients in my pantry. 

20 Oz. Vegetarian Hoisin Sauce (Certified Kosher)Authentic Hoisin Sauce is typically made with soybean paste, which (shockingly!) I didn't have on hand.  Soy sauce substitutes for the soybeans in this recipe. 

This hoisin sauce would taste great in a variety of dishes: as a dressing for slaw or salad, a marinade for chicken,  a stir-fry sauce, or a glaze for grilled shrimp.


Hoisin Sauce
8 tbsp soy sauce OR Worcestershire sauce ( I realized after I started that I only had 2 tbsp soy sauce, so I made up the difference with Worcestershire, and it tasted fine)
4 tbsp creamy peanut butter
2 tbsp molasses
3 tsp white vinegar
1/8 tsp garlic powder
1/8 tsp black pepper
1 tsp toasted sesame seeds (toast on a cookie sheet in the oven for 3-5 minutes, checking frequently and turning once)
Whisk all ingredients together until the consistency is even. 
Makes about 1/2 cup -- enough to marinate 1 pound of chicken or to dress 1 recipe of Mu Shu Beef

Labels: ,

Monday, July 11, 2011

Make it Yourself Monday: Easy Pickled Radishes

We have radishes in abundance from our CSA box this week.  So far I’ve prepared them in the most obvious ways possible: in salads and in a stir-fry.  After discussing it with my Stepmom, she gave me the fabulous idea to make Radish Pickles! She is one of the best cooks I know, but there have been a few times where she tells me how “easy” a recipe is only to have me completely bungle the whole thing. 

This recipe is super-easy, for real. I whipped these up in 10 minutes, and then refrigerated them overnight.  
Radish Pickles
5 Radishes
1 1/2 cup Apple Cider Vinegar
1/4-1/2 cup brown sugar
1/4 tsp salt
1. Add the cider vinegar, brown sugar, and salt to an 8 oz mason jar. Make sure to leave room at the top for displacement when you add the radishes (My kitchen rug now reeks of vinegar. You figure it out. Guess I should have taken physics.) Mix gently.
 2. Cut the radishes into strips, whatever size you want your “pickles” to be.
3. Add radishes to the jar with the vinegar mixture, cover,  and refrigerate at least 4 hours, preferably overnight.

Variation 1: For my second batch, I kept the radishes, vinegar, and sugar the same, but added 1/4 tsp ground ginger, 1/2 tsp soy sauce, and one smashed garlic clove.  They were divine.  
Variation 2: Use the original recipe but add one hot pepper to the jar. This will give the pickles a nice spicy kick.

Labels: , ,

Monday, June 27, 2011

Make it Yourself Monday: Pancake Syrup

Growing up, I totally thought that Mrs. AuntJemimasworth Lite was the be-all and end-all of pancake syrups.  We always had it in the refrigerator (never mind how many months? years? it had been there), and, to me, it tasted, well, good.

I would have continued on with this rosy illusion if I hadn't turned the bottle over in the supermarket one day when my first child was about 1, and read the ingredients. This is what it said:
HIGH FRUCTOSE CORN SYRUP, WATER, CELLULOSE GUM, SALT, NATURAL AND ARTIFICIAL FLAVOR, CARAMEL COLOR, SORBIC ACID AND SODIUM BENZOATE (PRESERVATIVES), SODIUM HEXAMETAPHOSPHATE.

Yikes. I had to take a minute right there in the aisle to mentally regroup.  There were only two ingredients I could actually identify as food (water and salt).  After I recovered from my shock and horror, I perused the shelves for a better alternative, and decided on maple syrup -- pure, 1 ingredient, and pretty easy to find locally made. Perfect.

Except I kind of missed that buttery rich (artificial) taste.  So I decided to doctor it up. And frankly, it could not be any easier.

Buttery Maple Syrup 
(adapted from SimpleBites)

1 cup Maple Syrup (I found Organic at Target for $3.99)
1 stick salted butter, cut into 1 tbsp chunks
1-2 tbsp water
1/2 tsp pure vanilla extract
1/2 tsp cinnamon

Warm the syrup and water in a small pan.  Whisk in the butter and stir until melted.  Add the vanilla and cinnamon and cook, stirring frequently, for about 1 minute, but not letting the mixture boil.

Best served warm but can be refrigerated for up to a week.  Make sure to warm it up on the stove before serving.

Warning: You will NEVER be able to use commercial syrup again after you taste this! It's that good.

Labels: ,

Monday, June 13, 2011

Make it Yourself Monday: Laundry Detergent

The last time I bought laundry detergent was a YEAR ago.


No, it was not because I've been using my own homemade detergent all that time. It is because what I bought a year ago was a 10-lb carton of Tide Original Powder from BJ's Warehouse. Even with coupons, it cost $37 (which isn't bad for a year's worth, but that's not the point).


The problem with Tide is it is filled with chemicals. I originally started using it because it is one of the few drugstore detergents that can be used with cloth diapers AND regular clothes. 
But it's chock-full of artifical scents, dyes, brighteners, and enzymes. That's no good for anyone, let alone for something I put on my baby's bum!


There are a TON of new cloth-diaper-friendly and eco-friendly detergents. The problem is that they are usually quite expensive. One of the best I've tried, Thirsties Cloth Diaper Super Wash, costs $20 for 64 loads.  It works great, is gentle on baby and the environment, but $20 isn't exactly a rock bottom price for approximately 3 month's worth of just diaper laundry. 


I wondered, is there a detergent that is gentle yet effective for clothes and diapers, and is inexpensive??


So, I did a little research and found this recipe on The Eco-Friendly Family blog. The recipe is just for cloth diapers, but I plan on using it on all my laundry. The "regular" detergent recipe involves grating soap, and I am much too lazy to do that. 
First, I assembled my ingredients (and a goofy kid):
  • 2 boxes of Borax -- $3.99 each
  • 3 boxes of Washing Soda -- $2.99 each
  • 1 96oz Tub of OxiClean -- $10.99 - $1/1 coupon in 4/17 SS = $9.99
Total Cost= $26.94

Then, I took my giant, now empty box of Tide which I saved and wiped clean, and dumped all the ingredients into it!  It is really that simple. 
I gave it a few good stirs with a long metal spatula; and I did rotate ingredients as I added them -- Borax, Washing Soda, Oxi, Borax, Washing Soda, etc. 

*Note* The Borax does create some dusty powder when you pour it in -- I would suggest doing it outside or perhaps using a face mask when you do this. Or, you could always just go all bank robber and tie a bandanna around your mouth and nose. 

I had ample opportunity to test out this recipe on all our laundry over the weekend, as both kids were suffering from some insidious stomach ickiness.  The good news is, the cloth diaper detergent works just as well as my old powder Tide did on all our clothes -- minus the optical brighteners, additives, and artificial gunk.

Pros of homemade laundry detergent:
  • Cheap
  • Effective
  • more eco-friendly than comparably priced commercial detergents (although not completely eco-friendly -- Borax, while natural, is pretty toxic, and I have no idea what's in OxiClean)
  • Easy to make
  • Makes 9-12 months worth of detergent in one go
  • It's what the Duggar's use
Cons:
  • Have to actually mix it up
  • Need somewhere to put it -- although I don't recommend my method of buying a huge 10-lb carton of detergent, waiting a year to use it up, then using your now-empty carton.


Labels: ,

Monday, June 6, 2011

Make it Yourself Monday: Guest Post!

My friend Kristin is a great cheerleader for this blog; she's also an awesome mom, wife, and friend. I'm excited to share her own Make it Yourself experience today. Here it is:


Thought I'd share a make-your-own adventure: I made my own hummus today! 
I've been buying a 20 oz tub of Cedar's hummus every week for what seems like ever. It is the most cost-effective brand for me, $4.99-5.99 at Hannaford depending on sales (we live in the boonies so driving to other stores just isn't worth it with gas being so expensive). I've known for a long time that I should try to make it myself but just never got to it. Well today I did, finally. 
Just blend 2 cans of garbanzo beans (will be using Eden's Organic with NO added salt from Amazon, $15.20 for 12 cans), 3+ tbsp lemon juice, 1 tsp (sea) salt, 2 cloves garlic and 3+ tbsp olive oil and a little water (depends how much lemon juice and olive oil you put in). 
Next time I will do the beans in small batches as I almost burned out my blender-- it was smoking by the time I got it all pureed. Final cost for a fairly big batch (probably around 30 oz?) around $3. I didn't have tahini, which most recipes include, but it was good without it. I'm guessing I saved at least half and it's probably healthier. Yay!


Thanks Kristin! I'm so happy you are being inspired to be creative and do make it yourself versions of favorite grocery store foods.  I buy a lot of hummus too and look forward to making it myself and saving money!

Labels:

Monday, May 30, 2011

Make it Yourself Monday: Memorial Day Edition


Since this is a holiday weekend, and many of us are honoring the troops with parades and picnics, I though homemade barbecue sauce would be a great Make-It-Yourself idea for this week. 
Let’s be honest, store-bought barbecue sauce is not that expensive. I bought 2 bottles at Wegmans for $1.49 each last week. But sometimes you either run out, or you’d like to make your own concoction that is free of artificial flavors and preservatives. 
I originally got this recipe from Emeril Lagasse from the Food Network, but I have tweaked it to my own tastes. It’s extremely adaptable.
3/4 cup apple cider vinegar
1 cup ketchup ( I found Hunt’s No-HFCS for $1/bottle at Price Rite)
1/4  cup packed dark brown sugar
1 tablespoon yellow mustard
1 tablespoon dark molasses
1 teaspoon salt
1 tbsp Worcestershire sauce

Stir all ingredients together vigorously, making sure to dissolve all the sugar.  Store, covered, in the refrigerator for up to a week. You can use it immediately, but it will taste better the next day, after the flavors have a chance to meld.

Labels: